Selasa, 20 Agustus 2019

ZigBee

Zigbee Setup
https://www.digi.com/products/iot-platform/xctu


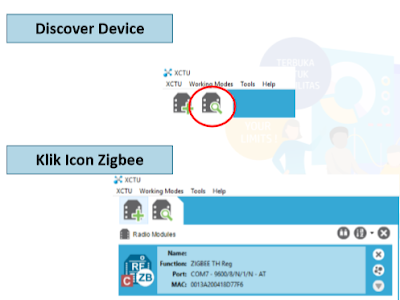
Ubah pengaturan berikut, kemudian klik Write


Transmitter 

const int potPin= 34; //Pot at Arduino A0 pin
int value ; //Value from pot
void setup() {
//Start the serial communication
Serial.begin(9600); //Baud rate must be the same as is on xBeemodule
 }
void loop() {
//Read the analog value from pot and store it to "value" variable
value = analogRead(potPin);
//Map the analog value to pwm value
value = map (value, 0, 1023, 0, 255);
//Send the message:
Serial.print('<');   //Starting symbol
Serial.print(value);//Value from 0 to 255
Serial.println('>');//Ending symbol
}


My SQL

Contoh Skenario IoT (SQL & NON-SQL)
thema : School


dirancang oleh kelompok 

LoRa (Long Range)

Comparison :
Wiring :

Import Library LoRa
 • Open Arduino IDE dan bukaSketch > Include Library > Manage Libraries dan cari LoRa by Sandeep Mistry version 0.3.0 dan klikinstall

Transceiver

#include <SPI.h> 
#include <LoRa.h>

//define the pins used by the transceiver module 
#define ss5
#define rst14 
#define dio0 2

intcounter = 0;
void setup() {
Serial.begin(115200);
while (!Serial);
Serial.println("LoRaSender");
//setup LoRatransceiver module
LoRa.setPins(ss, rst, dio0);
while (!LoRa.begin(433E6)) {
Serial.println(".");
delay(500); }
// Change sync word (0xF3) to match the receiver
// The sync word assures you don't get LoRamessages from other LoRatransceivers
// ranges from 0-0xFF
LoRa.setSyncWord(0xF3);
Serial.println("LoRaInitializing OK!");
}
void loop() {
Serial.print("Sending packet: ");
erial.println(counter);
//Send LoRapacket to receiver
LoRa.beginPacket();
LoRa.print("hello ");
LoRa.print(counter);
LoRa.endPacket();

counter++;

delay(10000);
}


REST API

Application Programming Interface (API) : is a set of routines, protocols, and tools for building software applications

Beberapa Jenis API :
• Representational State Transfer (REST)
• Remote Procedure Calls (RPC)
• Simple Object Access Protocol (SOAP)

REST
• REST kependekan dari REpresentational State Transfer
The REST architectural style describes six constraints. These constraints, applied to the architecture, were originally communicated by Roy Fielding in his doctoral dissertation (see https://www.ics.uci.edu/~fielding/pubs/dissertation/ rest_arch_style.htm) and defines the basis of RESTfulstyle. 

The six constraints are: 
• Uniform Interface 
• Stateless 
• Cacheable 
• Client-Server 
• Layered System 
• Code on Demand (optional)

  •  Generality – language agnostic 
  • Familiarity 
  • Scalability 
  • Segmentation 
  • Speed 
  • Security 
  • Encapsulation 

REST API
• Berjalan di atas protokol HTTP 
• Menggunakan JSON atau XML untuk mengirimkan data

JSON
• Better Language Support 
• Lightweight (much less code than XML)

PRAKTEK :
Database : xampp diaktifkan > Apache & my SQL

Buka localhost > phpmyadmin > input > choose File (sebelumnya download dahulu folder ServerRest
lalu File ServerRest dicut dan dipindahkan di xampp > htdocs > ServerRest

Buka postman isikan URL si localhost (http://127.0.0.1/serverrest/index.php/kontak)

Pilih menu Body selsct x-www-form-urlencoded
Dsini kita bisa pilih GET, POST, DELETE, ect...
untuk menjalankan fungsi lain harus ditambahin source code unutk DELETE, PUT, ect..
dengan membuka open folfer di visual code application > (kontak.php)


untuk mempelajari lebih detail dapat dilihat di


MQTT

Publish / Subscribe


Publisher and Subscriber

• Publisher: – client yang melakukan publish terhadap suatu topic – client ini mengirimkan message dengan topic tertentu :
Subscriber: – client yang melakukan subscribe terhadap suatu topic – client ini akan menerima semua message dalam topic tersebut
• Antara publisher dan subscriber tidak saling mengenal (tidak ada hubungan langsung)


Instalasi python publisher
 Sudah memiliki compiler python
• Jalankan program command prompt sebagai admin 
• Pindah ke direktori python compiler 
• Jalankan: cd Scripts Akan diperoleh tampilan
                                    
Instalasi python publisher
Jalankan: pip install paho-mqtt (untuk versi dibawah 3)atau pip3 install paho-mqtt
(untuk versi diatas 3).
Akan diperoleh:
                                     

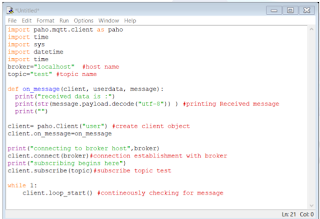
 Kode Python


 Keluaran python subscriber


Kode python untuk mengirim data ke thingsboard


- Download mosquitto
- Buka cloud MQTT > Login

- Buka cmd, pastikan sudah terinstall
dengan buka sesuai tempat moquitto

- Mosquitto_Sub -h localhost -t house/# -c3 -d

Pub : mosquitto-sub -t house/temp -h 192.168.43.114  (ini merupakan based on IP) -m
         enter

Sub : mosquitto -sub -t house/# -h 192.168.43.114 -c 3 -d
         enter


sumber : modul DTS 2019 


Minggu, 11 Agustus 2019

HTPP in Thingspeakwith ESP 32

Pada percobaan kali ini, kita akan mensimulasikan project dengan menampilkan suhu ruangan dengan menggunakan dengan ESP 32.
dalam hal ini untuk menampilkan suhu ruangan akan menggunakan interface di Thingspeak https://thingspeak.com. tentunya harus terintegrasi ke Arduino IDE


code :

#include <WiFi.h>

String apiKey = "MDHVBTVAMANPPZ66";                  //  Enter your Write API key from ThingSpeak
const char *ssid =  "Tara";                                    // replace with your wifi ssid and wpa2 key
const char *pass =  "12345";
const char* server = "api.thingspeak.com";

WiFiClient client;


void setup()
{
  Serial.begin(115200);
  delay(10);
  Serial.println("Connecting to ");
  Serial.println(ssid);
  WiFi.begin(ssid, pass);
  while (WiFi.status() != WL_CONNECTED)
  {
    delay(500);
    Serial.print(".");
  }
  Serial.println("");
  Serial.println("WiFi connected");
}

void loop()
{

  int h = 0;
  float t = 0;

  h = random(1, 10);
  t = ((random(1 - 50) - 32) / 1.8);          //changing temperature parameter to celsius
  if (client.connect(server, 80))                                //   "184.106.153.149" or api.thingspeak.com
  {
    String postStr = apiKey;
    postStr += "&field1=";
    postStr += String(h);
    postStr += "&field2=";
    postStr += String(t);
    postStr += "\r\n\r\n";

    client.print("POST /update HTTP/1.1\n");
    client.print("Host: api.thingspeak.com\n");
    client.print("Connection: close\n");
    client.print("X-THINGSPEAKAPIKEY: " + apiKey + "\n");
    client.print("Content-Type: application/x-www-form-urlencoded\n");
    client.print("Content-Length: ");
    client.print(postStr.length());
    client.print("\n\n");
    client.print(postStr);

    Serial.println(postStr);

    Serial.print("Hall: ");
    Serial.println(h);
    Serial.print("Temperature:");
    Serial.print(t);
    Serial.println(" C");

    Serial.println("%. Send to Thingspeak.");
  }
  client.stop();
  Serial.println("Waiting...");
  delay(10000);


}

Thingspeak adalah : adalah platform Internet of Things yang dapat digunakan secara gratis untuk menampilkan chart suatu peralatan IoT

GUI :


Terlebih dahulu, kita harus memiliki account thingspeak untuk dapat login


 atur GUI pada channel settings untuk menampilkan output yang diinginkan 


setelah disetting, maka copy-paste kode API pada thingspeak


maka layer utama akan menjadi seperti dibawah ini :

Rabu, 07 Agustus 2019

WIFI with ESP32

Percobaan ini kita merancang pendeteksi suhu ruangan dengan menggunakan DHT 1. Sensor ini selain dapat mengukur suhu dapat pula mengukur kelembaman ruangan. Diharapkan dalam simulasi ini, kita dapat melihat outputnya berupa hasil pengukuran suhu yang dideteksi oleh DHT 11 ini dengan menampilkan di Web Server. Sehingga dalam hal ini ESP32 harus terkoneksi dengan jaringan WIFI. Ketika uploading selesai maka diserial monitor akan ditampilkan IP Address dari Web Server tersebut. Selamat Mencoba!

Perangkat yang dibutuhkan :

  • ESP32 dengan kabel USB
  • DHT 11
  • 4 buah Kabel Jumper 
  • 1 buah Motherboard
Gambar Rangkaian : 


Code : 

#include <WiFi.h>
#include <WebServer.h>
#include <DHT.h>

// Uncomment one of the lines below for whatever DHT sensor type you're using!
#define DHTTYPE DHT11   // DHT 11
//#define DHTTYPE DHT21   // DHT 21 (AM2301)
//#define DHTTYPE DHT22   // DHT 22  (AM2302), AM2321

/*Put your SSID & Password*/
const char* ssid = "Sandralan";  // Enter SSID here
const char* password = "kustianto";  //Enter Password here

WebServer server(80);

// DHT Sensor
uint8_t DHTPin = 35; 
               
// Initialize DHT sensor.
DHT dht(DHTPin, DHTTYPE);                

float Temperature;
float Humidity;

void setup() {
  Serial.begin(115200);
  delay(100);
  
  pinMode(DHTPin, INPUT);

  dht.begin();              

  Serial.println("Connecting to ");
  Serial.println(ssid);

  //connect to your local wi-fi network
  WiFi.begin(ssid, password);

  //check wi-fi is connected to wi-fi network
  while (WiFi.status() != WL_CONNECTED) {
    delay(1000);
    Serial.print(".");
  }
  
  Serial.println("");
  Serial.println("WiFi connected..!");
  Serial.print("Got IP: ");  Serial.println(WiFi.localIP());

  server.on("/", handle_OnConnect);
  server.onNotFound(handle_NotFound);

  server.begin();
  Serial.println("HTTP server started");

}

void loop() {
  server.handleClient();
  
}

void handle_OnConnect() {

 Temperature = dht.readTemperature(); // Gets the values of the temperature
  Humidity = dht.readHumidity(); // Gets the values of the humidity 
  server.send(200, "text/html", SendHTML(Temperature,Humidity)); 
}

void handle_NotFound(){
  server.send(404, "text/plain", "Not found");
}

String SendHTML(float Temperaturestat,float Humiditystat){
  String ptr = "<!DOCTYPE html> <html>\n";
  ptr +="<head><meta name=\"viewport\" content=\"width=device-width, initial-scale=1.0, user-scalable=no\">\n";
  ptr +="<title>ESP32 Weather Report</title>\n";
  ptr +="<style>html { font-family: Helvetica; display: inline-block; margin: 0px auto; text-align: center;}\n";
  ptr +="body{margin-top: 50px;} h1 {color: #444444;margin: 50px auto 30px;}\n";
  ptr +="p {font-size: 24px;color: #444444;margin-bottom: 10px;}\n";
  ptr +="</style>\n";
  ptr +="</head>\n";
  ptr +="<body>\n";
  ptr +="<div id=\"webpage\">\n";
  ptr +="<h1>ESP32 Weather Report</h1>\n";
  
  ptr +="<p>Temperature: ";
  ptr +=(int)Temperaturestat;
  ptr +="°C</p>";
  ptr +="<p>Humidity: ";
  ptr +=(int)Humiditystat;
  ptr +="%</p>";
  
  ptr +="</div>\n";
  ptr +="</body>\n";
  ptr +="</html>\n";
  return ptr;
}

Bluetooth Low Energy (BLE)

BLE Server and Client
  • Broadcast mode: the server transmits data to many clients that are connected
  • Mesh network: all the devices are connected, this is a many to many connections
kita bisa melakukan simulasi dengan code sederhana yang telah disediakan oleh software Arduino seperti : 

BLE Server :


#include <BLEDevice.h>
#include <BLEUtils.h>
#include <BLEServer.h>

// See the following for generating UUIDs:
// https://www.uuidgenerator.net/

#define SERVICE_UUID        "4fafc201-1fb5-459e-8fcc-c5c9c331914b"
#define CHARACTERISTIC_UUID "beb5483e-36e1-4688-b7f5-ea07361b26a8"

void setup() {
  Serial.begin(115200);
  Serial.println("Starting BLE work!");

  BLEDevice::init("MyESP32");
  BLEServer *pServer = BLEDevice::createServer();
  BLEService *pService = pServer->createService(SERVICE_UUID);
  BLECharacteristic *pCharacteristic = pService->createCharacteristic(
                                         CHARACTERISTIC_UUID,
                                         BLECharacteristic::PROPERTY_READ |
                                         BLECharacteristic::PROPERTY_WRITE
                                       );

  pCharacteristic->setValue("Hello World says Neil");
  pService->start();
  BLEAdvertising *pAdvertising = pServer->getAdvertising();
  pAdvertising->start();
  Serial.println("Characteristic defined! Now you can read it in your phone!");
}

void loop() {
  // put your main code here, to run repeatedly:
  delay(2000);
}

BLE Client :

#include "BLEDevice.h"
//#include "BLEScan.h"

// The remote service we wish to connect to.
static BLEUUID serviceUUID("91bad492-b950-4226-aa2b-4ede9fa42f59");
// The characteristic of the remote service we are interested in.
static BLEUUID    charUUID("0d563a58-196a-48ce-ace2-dfec78acc814");

static BLEAddress *pServerAddress;
static boolean doConnect = false;
static boolean connected = false;
static BLERemoteCharacteristic* pRemoteCharacteristic;

static void notifyCallback(
  BLERemoteCharacteristic* pBLERemoteCharacteristic,
  uint8_t* pData,
  size_t length,
  bool isNotify) {
    Serial.print("Notify callback for characteristic ");
    Serial.print(pBLERemoteCharacteristic->getUUID().toString().c_str());
    Serial.print(" of data length ");
    Serial.println(length);
}

bool connectToServer(BLEAddress pAddress) {
    Serial.print("Forming a connection to ");
    Serial.println(pAddress.toString().c_str());
    
    BLEClient*  pClient  = BLEDevice::createClient();
    Serial.println(" - Created client");

    // Connect to the remove BLE Server.
    pClient->connect(pAddress);
    Serial.println(" - Connected to server");

    // Obtain a reference to the service we are after in the remote BLE server.
    BLERemoteService* pRemoteService = pClient->getService(serviceUUID);
    if (pRemoteService == nullptr) {
      Serial.print("Failed to find our service UUID: ");
      Serial.println(serviceUUID.toString().c_str());
      return false;
    }
    Serial.println(" - Found our service");


    // Obtain a reference to the characteristic in the service of the remote BLE server.
    pRemoteCharacteristic = pRemoteService->getCharacteristic(charUUID);
    if (pRemoteCharacteristic == nullptr) {
      Serial.print("Failed to find our characteristic UUID: ");
      Serial.println(charUUID.toString().c_str());
      return false;
    }
    Serial.println(" - Found our characteristic");

    // Read the value of the characteristic.
    std::string value = pRemoteCharacteristic->readValue();
    Serial.print("The characteristic value was: ");
    Serial.println(value.c_str());

    pRemoteCharacteristic->registerForNotify(notifyCallback);
}
/**
 * Scan for BLE servers and find the first one that advertises the service we are looking for.
 */
class MyAdvertisedDeviceCallbacks: public BLEAdvertisedDeviceCallbacks {
 /**
   * Called for each advertising BLE server.
   */
  void onResult(BLEAdvertisedDevice advertisedDevice) {
    Serial.print("BLE Advertised Device found: ");
    Serial.println(advertisedDevice.toString().c_str());

    // We have found a device, let us now see if it contains the service we are looking for.
    if (advertisedDevice.haveServiceUUID() && advertisedDevice.getServiceUUID().equals(serviceUUID)) {

      // 
      Serial.print("Found our device!  address: "); 
      advertisedDevice.getScan()->stop();

      pServerAddress = new BLEAddress(advertisedDevice.getAddress());
      doConnect = true;

    } // Found our server
  } // onResult
}; // MyAdvertisedDeviceCallbacks


void setup() {
  Serial.begin(115200);
  Serial.println("Starting Arduino BLE Client application...");
  BLEDevice::init("");

  // Retrieve a Scanner and set the callback we want to use to be informed when we
  // have detected a new device.  Specify that we want active scanning and start the
  // scan to run for 30 seconds.
  BLEScan* pBLEScan = BLEDevice::getScan();
  pBLEScan->setAdvertisedDeviceCallbacks(new MyAdvertisedDeviceCallbacks());
  pBLEScan->setActiveScan(true);
  pBLEScan->start(30);
} // End of setup.


// This is the Arduino main loop function.
void loop() {

  // If the flag "doConnect" is true then we have scanned for and found the desired
  // BLE Server with which we wish to connect.  Now we connect to it.  Once we are 
  // connected we set the connected flag to be true.
  if (doConnect == true) {
    if (connectToServer(*pServerAddress)) {
      Serial.println("We are now connected to the BLE Server.");
      connected = true;
    } else {
      Serial.println("We have failed to connect to the server; there is nothin more we will do.");
    }
    doConnect = false;
  }

  // If we are connected to a peer BLE Server, update the characteristic each time we are reached
  // with the current time since boot.
  if (connected) {
    String newValue = "Time since boot: " + String(millis()/1000);
    Serial.println("Setting new characteristic value to \"" + newValue + "\"");
    
    // Set the characteristic's value to be the array of bytes that is actually a string.
    pRemoteCharacteristic->writeValue(newValue.c_str(), newValue.length());
  }
  
  delay(1000); // Delay a second between loops.
} // End of loop


untuk menampilkan informasi yang dikirim dapat dilihat dari smartphone dengan mengunduh aplikasi nRF Connect


Adapun contoh project yang menggunakan komunikasi BLE yaitu 
"pendeteksi gerakan dengan menggunakan sensor PIR"

Code : 

#define timeSeconds 10

// Set GPIOs for LED and PIR Motion Sensor
const int led = 26;
const int motionSensor = 27;

// Timer: Auxiliary variables
unsigned long now = millis();
unsigned long lastTrigger = 0;
boolean startTimer = false;

// Checks if motion was detected, sets LED HIGH and starts a timer
void IRAM_ATTR detectsMovement() {
  Serial.println("MOTION DETECTED!!!");
  digitalWrite(led, HIGH);
  startTimer = true;
  lastTrigger = millis();
}

void setup() {
  // Serial port for debugging purposes
  Serial.begin(115200);
  
  // PIR Motion Sensor mode INPUT_PULLUP
  pinMode(motionSensor, INPUT_PULLUP);
  // Set motionSensor pin as interrupt, assign interrupt function and set RISING mode
  attachInterrupt(digitalPinToInterrupt(motionSensor), detectsMovement, RISING);

  // Set LED to LOW
  pinMode(led, OUTPUT);
  digitalWrite(led, LOW);
}

void loop() {
  // Current time
  now = millis();
  // Turn off the LED after the number of seconds defined in the timeSeconds variable
  if(startTimer && (now - lastTrigger > (timeSeconds*1000))) {
    Serial.println("Motion stopped...");
    digitalWrite(led, LOW);
    startTimer = false;
  }
}
Selasa, 06 Agustus 2019

Bluetooth Classic with ESP32

Pada percobaan pertama ini, kita akan mencoba untuk mengirim data menggunakan komunikasi bluetooth sederhana. Adapun simulasi project yang di rangkai yaitu menghidupkan LED dengan inputan data dari handphone menggunakan aplikasi Serial Bluetooth Terminal 1.27.
Kondisi yang ingin ditampilkan yaitu :

  • 0  LED turned OFF
  • 1  LED turned ON
  • 2  LED turned ON-OFF
Selamat Mencoba!

Perangkat yang dibutuhkan :
  • ESP32 dengan kabel USB
  • LED 
  • Resistor
  • 2 buah Kabel Jumper
  • 1 buah Motherboard
Gambar Rangkaian : 
Code : 

#include "BluetoothSerial.h" //Header File for Serial Bluetooth, will be added by default into Arduino

BluetoothSerial ESP_BT; //Object for Bluetooth

int incoming;
const int pinLED = 14;

void setup() {
  Serial.begin(9600); //Start Serial monitor in 9600
  ESP_BT.begin("ESP32_LED"); //Name of your Bluetooth Signal
  Serial.println("Bluetooth Device is Ready to Pair");

  pinMode (pinLED, OUTPUT);//Specify that LED pin is output
}

void loop() {
 
  if (ESP_BT.available()) //Check if we receive anything from Bluetooth
  {
    incoming = ESP_BT.read(); //Read what we recevive
    Serial.print("Received:"); Serial.println(incoming);

    if (incoming == 49)
        {
        digitalWrite(pinLED, HIGH);
        ESP_BT.println("LED turned ON");
        }
       
    if (incoming == 48)
        {
        digitalWrite(pinLED, LOW);
        ESP_BT.println("LED turned OFF");
        }  
     if (incoming == 50)
        {
        ESP_BT.println("LED turned ON-OFF");
        digitalWrite(pinLED, HIGH);
        delay (1000);
        digitalWrite(pinLED, LOW);
        delay (1000);
        digitalWrite(pinLED, HIGH);
        delay (1000);
        digitalWrite(pinLED, LOW);
        delay (1000);
        digitalWrite(pinLED, HIGH);
        delay (1000);
        digitalWrite(pinLED, LOW);
        delay (1000);
        }     
  }
  delay(20);
}

Tampilan di Serial Bluetooth :


Introduction to ESP32 Device Module & Install Software ESP32

Mari kita lihat tentang pengaturan Arduino IDE dengan ESP32 Device Module.
Pertama Unduh Arduino IDE   https://www.arduino.cc/en/Main/Software
Open Arduino IDE dan Buka File -> Preferences

Sekarang di jendela Preferensi, Masukkan tautan di bawah ini di URL https://dl.espressif.com/dl/package_esp32_index.json  
jika sudah ada URL ESP8266 atau yang lainnya, bisa dipisahkan dengan koma seperti di bawah ini: https://dl.espressif.com/dl/package_esp32_index.json,http://arduino.esp8266.com/stable/package_esp8266com_index.json

Sekarang tutup jendela Preferensi dan bukaTools -> Board -> Boards Manager


Di jendela Boards Manager, ketik esp di kotak pencarian, esp32 akan tercantum di bawah ini.Sekarang pilih versi terbaru board dan klik install.


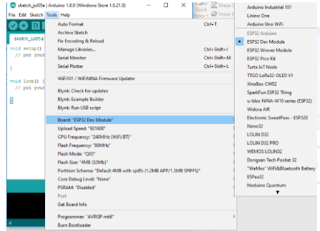
Setelah pemasangan board selesai, buka Tools->Board-> dan pilih ESP32 Dev Module


PRATEK 1 : Uji Coba ESP32
Mari kita lihat bagaimana menulis sketsa cetak serial sederhana menggunakan Arduino IDE untuk ESP32 Dev Module. Pertama, hubungkan Kit Development ESP32 Dev Module dengan PC seperti yang ditunjukkan pada gambar dibawah ini.


Coba cek port yang ada pada Arduino IDE. Apabila port tidak muncul maka anda harus menginstal ESP32 CP210x USB to UART Bridge VCP Drivers pada alamat berikut

Setelah mengatur Arduino IDE untuk ESP32 Dev Module, buka Arduino IDE dan tulis sketsa cetak serial sederhana seperti yang ditunjukkan pada software dibawah ini.


Pastikan Anda telah memilih board yang benar seperti yang ditunjukkan pada gambar di bawah ini. Juga pastikan bahwa Anda telah memilih port COM yang sesuai.


Sekarang kompilasi & unggah sketsa tertulis langsung ke Kit Dev ESP32 Dev Module dengan mengklik tombol unggah.